

Creating a star cluster tattoo is one of the dreamiest ways to bring holiday magic to your artwork. These tiny, scattered stars can symbolize hope, blessings, and the quiet glow of winter nights. Whether you’re practicing for a small wrist tattoo or building a larger festive piece, this guide walks you through each step—beginner-friendly, warm, and totally Christmas-ready.

Start With a Light Sketch to Map Your Star Cluster
Before you dive into details, begin with a loose layout. Star clusters look effortless, but the balance depends on how you scatter the shapes. Use a light pencil so you can adjust placement easily.
Try these tips as you sketch:
- Place one larger star as the “anchor.”
- Add 6–10 smaller stars around it.
- Leave natural spacing so the design feels airy.
- Keep the shapes simple and clean.

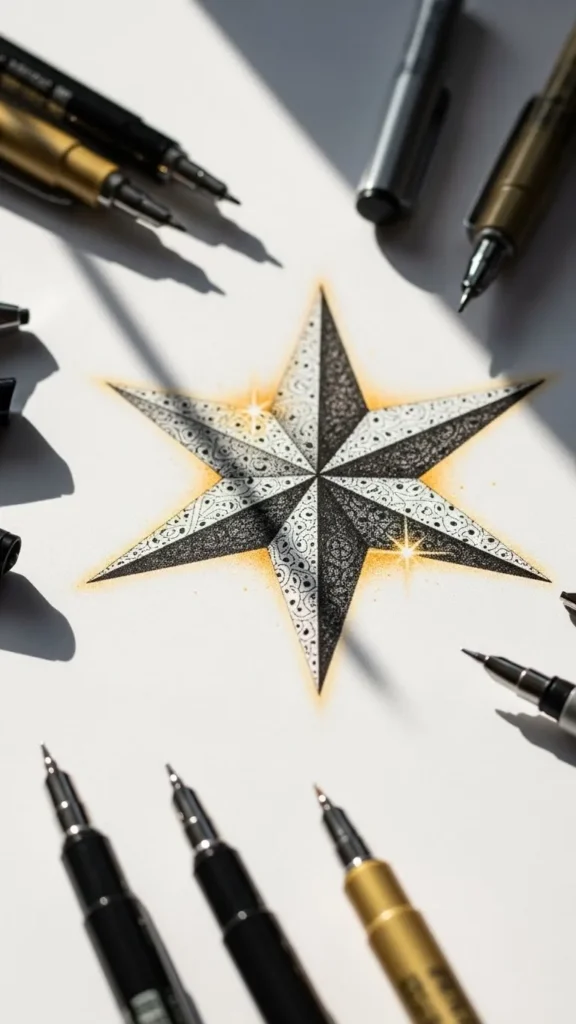
Define the Main Star to Make It the Focal Point
Your central star should feel bold but still elegant. Most artists choose a classic five-point design or a geometric shape with crisp symmetry. Both look great for Christmas-themed tattoos.
To create a standout focal star:
- Draw clean lines with slow, steady strokes.
- Add gentle inner shading for dimension.
- Keep the shape slightly larger than the surrounding stars.
This helps guide the viewer’s eye while keeping your tattoo visually balanced.

Add Smaller Stars to Create a Natural Cluster Effect
Once your main star is finished, start adding tiny supporting stars around it. These mini stars make the tattoo feel whimsical and full of movement—perfect for the Christmas season.
Vary your designs by mixing:
- Mini five-point stars
- Tiny sparkle-style crosses
- Dotted highlights for extra shine
Scatter them loosely, as if they’re gently floating. The beauty of star clusters comes from this organic, natural look.
Enhance the Glow With Soft Shading and Subtle Highlights
Shading brings your stars to life. Even the smallest shadows can make your cluster look more magical. Use a soft pencil or fine-tip pen for gentle gradient shading.
Here’s what to focus on:
- Shade one side of each star to mimic light direction.
- Keep the shading soft and light.
- Add tiny dots around the cluster for a dreamy glow.
- Leave highlights untouched to keep the stars bright.
This step adds softness that feels very “winter night sky.”
Outline Everything Cleanly to Create a Tattoo-Ready Look
The outline is where your design shifts from sketch to final tattoo concept. Clean, confident lines make your star cluster feel polished and ink-worthy.
Use these tips for smooth outlining:
- Choose a fine-liner pen for precision.
- Glide slowly so your lines stay steady.
- Keep the outline delicate—thin lines make star tattoos look modern and elegant.
- Avoid overworking any one area.
This is also the perfect moment to refine any uneven edges or add extra sparkle dots for detail.
Add Festive Flair With Optional Christmas Elements
If you want your star cluster to feel even more holiday-inspired, add subtle Christmas touches. These can be small, tasteful additions that support the design without overwhelming it.
Try simple ideas like:
- A tiny evergreen sprig near the main star
- A little snowflake mixed into the cluster
- A curved swirl suggesting winter wind
- A faint halo glow inspired by holiday lights
Each detail helps your tattoo feel personal, seasonal, and full of warmth.
Final Touches: Adjust Balance, Spacing, and Flow
Once all elements are in place, step back and view your piece as a whole. The magic of a star cluster comes from how naturally the stars blend together.
Do a final check:
- Are the stars balanced left to right?
- Does the spacing feel natural?
- Are the lines clean and consistent?
- Does the design flow in one direction or gently scatter?
Make small tweaks as needed, and keep everything light and airy. Christmas-themed tattoos shine when they feel effortless, calm, and magical.
Your Magical Star Cluster Is Ready
Now you have a festive, beautifully balanced star cluster tattoo sketch—perfect for Christmas vibes and winter-season creativity.
Keep experimenting with new shapes, spacing, and little holiday touches until the design feels like your own. And if you want to explore more tattoo ideas, save this guide and come back anytime.
Save this tutorial for later and keep shining in your holiday art!

Leave a Reply